

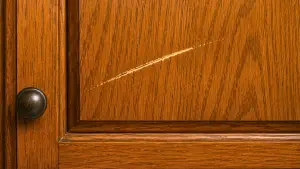
Is a stray scratch on your favorite wooden cabinet catching your eye every time you walk into the room? You don’t need to call a professional or refinish the whole piece just yet. From surprising pantry staples like walnuts to professional-grade touch-up kits, there are several ways to bring your furniture back to life. Whether you’re dealing with a minor scuff or a deep gouge, this guide will walk you through the best 4 DIY ways to fix scratches on your wooden cabinets.
 This simple step-by step guide will show show you how to fix minor scratches on your wooden cabinets at a low cost. So, if you like small home projects this article is for you. The steps are broken down so anyone can follow. Let’s get into it.
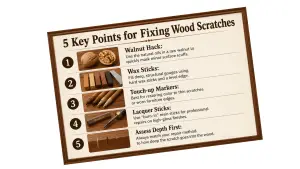
4 DIY Ways to Fix Scratches on Wooden Cabinets:
1. The Walnut Wonder: A Quick Kitchen Fix
It might sound like an old wives’ tale, but rubbing a walnut on a scratched wooden cabinet is a highly effective way to mask minor damage. This works because the natural oils in the nut darken the exposed wood, while the soft nut meat fills in the indentation.
How to Do It
- Prep the Nut: Use a raw (not roasted or salted) walnut. Crack it open to reveal the nut meat.
- Rub the Scratch: Rub the walnut meat over the scratch at a diagonal angle. Do not rub along the length of the scratch; rubbing across it ensures the oils and pulp get trapped inside the groove.
- Wait and Set: Let the oils soak into the wood for about 5 to 10 minutes.
- Buff it Out: Take a soft, clean cloth and buff the area gently. This removes any excess nut pulp and blends the oil into the surrounding finish.
Why It Works
The walnut contains natural oils that act as a wood stain, matching many medium-to-dark wood finishes (like oak, mahogany, or walnut itself). The soft pulp acts as a temporary filler for the physical groove.
Important Considerations
- Surface Scratches Only: This method is best for “scuffs” or light scratches that haven’t gouged deep into the wood.
- Color Matching: Walnuts work best on medium-brown woods.
- Allergies: If anyone in your household has a severe nut allergy, avoid this method.
- Longevity: This is a cosmetic fix, not a permanent repair. Over time, you might need to reapply.
When to Use Pro Alternatives
If the scratch is deep enough to catch your fingernail or if the wood is splintering, a walnut won’t provide a lasting or level repair. Instead, let’s look at some more professional repairs:
2. Hard Wax Sticks for Deep Gouges:
Think of these like heavy-duty crayons for your furniture! To use a hard wax stick, pick a color that matches your wood as closely as possible.
You can rub the stick directly over the gouge with firm pressure, or for a cleaner look, shave off a tiny piece and press it into the hole using a plastic putty knife.
Once the hole is filled just a bit above the surface, use the edge of a credit card to level the wax flush with the wood. Give it a quick buff with a cloth, and the hole practically disappears.
3. Furniture Touch-up Markers for Color Matching:
These are your best friend for worn edges or long, thin scratches that have lost their color. It’s just like coloring in a book!
Start by testing the marker in a hidden spot to make sure the shade is right. Draw along the scratch, then quickly wipe it with a soft cloth to blend the ink so it doesn’t look too dark.
If it’s still a bit light after it dries, just add another layer. It’s all about building up the color slowly.
4. Shellac or Lacquer Sticks for High-Gloss Finishes:
Now, this is the “advanced class” method. For high-gloss, fancy finishes, we use “burn-in” sticks. These require a heat source—like a soldering iron or a specialized heated knife—to melt the resin right into the scratch.
Once that liquid resin fills the gap and hardens, you carefully level it off with a sharp blade and polish it up to match the shine of the rest of the piece. It takes a steady hand, but it gives the most seamless, professional result possible.
Conclusion:
Fixing a scratch doesn’t have to be a daunting task. Whether you’re reaching into the pantry for a walnut to handle a quick scuff or breaking out the wax sticks for a deeper repair, the key is patience and choosing the right tool for the job. Start with the simplest method first, and don’t be afraid to experiment with color blending to get that perfect match. With these four techniques in your DIY toolkit, your wooden cabinets will be looking like new in no time!


Comments are closed.