

If your oven has reached that point where you open it and immediately close it back… I’ve been there.
Grease baked on, spills from last week (or last month), and that smell that just lingers no matter how much you clean the rest of your kitchen.
In this post, I’m showing you my go-to oven cleaner DIY that I use when I need a real kitchen reset. This is one of those oven cleaning hacks that actually makes a difference—and you don’t need anything fancy to get it done.
I Used to Ignore My Oven… Until It Got Out of Control
I’m going to be honest with you.
There was a time I cleaned everything in my kitchen except the oven.
Countertops? Clean.
Sink? Sparkling.
Floor? Mopped.
But that oven? I acted like it didn’t exist.
Until one day I turned it on and the smell hit me before the heat did.
That’s when I knew… it was time.
Why This DIY Oven Cleaner Works (From Experience)
What I like about this method is how simple it is.
You’re not using anything complicated—just a combination that softens grease and lifts all that baked-on mess so you’re not scrubbing forever.
That’s why this has become one of my favorite kitchen cleaning hacks. It works with what you already have at home, and it fits right into a realistic home cleaning routine.
What I Use (Nothing Fancy)
Here’s exactly what I use when I clean my oven:
-
Baking soda
-
Water
-
White vinegar
-
A sponge or scrub brush
-
A bowl for mixing
That’s it.
No strong fumes, no expensive products—just a simple DIY oven cleaner that gets the job done.
The Homemade Oven Cleaner:
How I Clean My Oven Step-by-Step
Step 1: Clear Everything Out
I start by removing the racks and brushing out any loose crumbs.
This alone already starts the reset feeling.
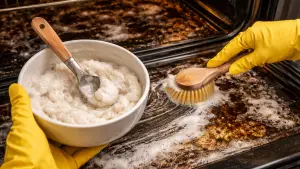
Step 2: Make the Paste
I mix baking soda with a little water until it forms a thick paste.
Not too runny—you want it to stick to the surface.
Step 3: Spread It All Over
I spread the paste inside the oven, focusing on:
-
The bottom
-
The sides
-
The oven door
Anywhere I see buildup, it gets covered.
Then I leave it alone and let it sit.
Step 4: Let It Do the Work
This is the part most people rush—but this is where the magic happens.
I let it sit long enough to soften everything that’s been stuck in there.
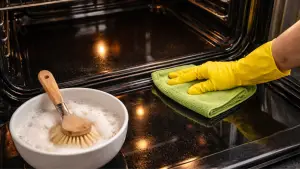
Step 5: Spray and Wipe
I come back with vinegar in a spray bottle and lightly spray over the paste.
Then I start wiping.
You’ll notice the grime comes off much easier at this point.
Step 6: Go Over Stubborn Spots
If something doesn’t come off right away, I just go back over it.
No pressure, no rushing.
That’s the difference with this oven cleaning hack—you’re working smarter, not harder.
Step 7: Clean the Racks
I usually clean the racks separately with the same mixture or soak them and wipe them down after.
Step 8: Final Wipe Down
I finish with a clean damp cloth to remove any leftover residue.
And just like that… the oven is back.
How I Keep It Clean (So I Don’t Start Over Again)
After doing a full deep clean, I try not to let it get that bad again.
Here’s what I do:
-
Wipe small spills before they bake in
-
Do a quick wipe once a week
-
Save the deep clean for when it actually needs it
It keeps my home cleaning routine simple and manageable.
What I Don’t Do Anymore
After trial and error, here’s what I avoid:
-
Cleaning while the oven is still hot
-
Using anything too rough that can damage the surface
-
Waiting too long between cleans
Trust me… I’ve learned the hard way.
Why I Stick With This Method
I’ve tried store-bought cleaners before, and while they work, I just don’t like the smell or the effort.
This DIY oven cleaner feels easier, safer, and honestly just more practical for everyday home cleaning.
Final Thoughts: A Clean Oven Changes the Whole Kitchen
There’s something about cleaning your oven that makes your entire kitchen feel different.
It’s not just about removing grease—it’s that full reset feeling.
So if your oven has been sitting there waiting… this is your sign.
Go ahead and take care of it today.
")

Comments are closed.