


If you’ve ever pulled laundry out of the dryer and thought, Why does this feel stiff even after fabric softener?—you’re not alone. I hit that same wall and decided to experiment with fabric softener alternatives that actually work. What I discovered surprised me: many everyday household items soften clothes better than store-bought softeners, without the heavy residue. These alternatives are budget-friendly, gentle on fabrics, and kinder to sensitive skin. Even better, they don’t clog washer parts or trap odors in clothing fibers. Some of them you already have sitting at home right now. Others are simple swaps that take no extra effort. Once I made the switch, I never looked back. Let’s start with the one that shocked me the most.
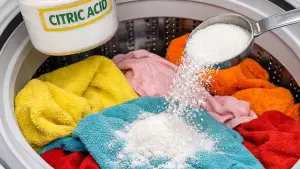
Citric Acid
Citric acid works as a natural fabric softener by breaking down mineral buildup left behind by hard water. When minerals cling to fabric fibers, they cause stiffness and dullness over time.
Adding one to two tablespoons of citric acid to the rinse cycle helps neutralize those minerals instantly. Clothes come out noticeably softer and brighter without feeling coated. It’s especially helpful for towels that have lost their plush feel.
I dissolve the citric acid in warm water first so it distributes evenly. This method also helps eliminate lingering detergent residue. There’s no scent left behind, just clean, flexible fabric. Once you feel the difference, you’ll be curious to try another gentle alternative.

Hair Conditioner
Hair conditioner softens clothes the same way it softens hair—by smoothing fibers and reducing friction. I mix one tablespoon of conditioner with one cup of warm water and add it to the fabric softener compartment.
The key is using a basic, silicone-free conditioner for best results. Clothes feel soft without that waxy buildup commercial softeners leave behind.
This works beautifully for cotton, knits, and everyday wear. It’s especially helpful for clothes that feel scratchy after air drying. The scent is light and fades naturally after drying. Nothing smells overpowering or artificial. After this trick, baking soda felt like the perfect next step.
Baking Soda
Baking soda softens clothes by balancing pH levels inside the wash. When fabric fibers are exposed to acidic or alkaline detergents, they stiffen over time.
Adding half a cup of baking soda directly into the wash drum helps neutralize that imbalance. Clothes come out softer, cleaner, and fresher without added fragrance.
It also boosts detergent performance, meaning you may need less soap. Baking soda is safe for colors and whites alike. I use it most for everyday loads and gym clothes. It doesn’t coat fabric; it cleans it. Once your clothes feel lighter, aluminum foil becomes surprisingly logical.
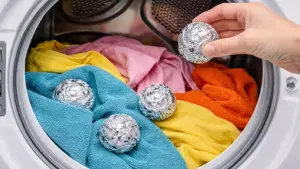
Aluminum Foil
Aluminum foil reduces static, which often makes clothes feel stiff and clingy. I roll foil into a tight ball and toss it directly into the dryer. As clothes tumble, the foil discharges static electricity naturally.
The result is softer-feeling fabric with less cling and wrinkling. There’s no residue, no scent, and no chemical coating involved. One foil ball can be reused for weeks. It works especially well with synthetic fabrics. Clothes come out relaxed instead of stiff. After seeing how well this works, essential oils add the perfect finishing touch.
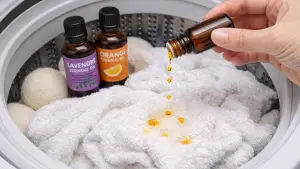
Essential Oils (Lavender & Orange)
Essential oils don’t technically soften fibers, but they enhance softness by preventing overdrying and adding freshness.
I add a few drops of lavender or orange oil to wool dryer balls. As clothes tumble, the scent disperses gently and evenly. Lavender promotes a calming, clean aroma, while orange adds a bright, fresh note. Clothes feel softer because static is reduced and fibers aren’t overheated.
There’s no heavy perfume lingering afterward. This method works best when paired with another softening agent. It’s subtle but effective. Once you try this, wool dryer balls become non-negotiable.
Wool Dryer Balls
Wool dryer balls soften clothes by improving airflow inside the dryer. They bounce between fabrics, separating fibers and reducing stiffness.
This prevents clothes from clumping and overdrying. I use three to six balls per load depending on size. Clothes dry faster, feel fluffier, and wrinkle less.
They’re reusable for years, making them incredibly cost-effective. Wool balls are perfect for sensitive skin households. No chemicals touch your clothes at all. Once you experience this, laundry sheets feel like a modern upgrade.
Laundry Sheets
Laundry sheets are thin, dissolvable sheets that replace liquid softeners and detergents. They soften clothes without leaving residue behind.
I toss one sheet directly into the washer with my load. Clothes come out flexible and lightweight, not coated or sticky. They’re especially great for travel or small laundry spaces. Many sheets are fragrance-free or lightly scented.
There’s no measuring and no mess. Fabrics feel clean instead of weighed down. After simplifying with sheets, vinegar became my favorite classic solution.
Vinegar
Vinegar softens clothes by stripping away detergent buildup trapped in fibers. I add half a cup of white vinegar to the rinse cycle.
Despite the smell going in, clothes come out completely odor-free. Towels regain their absorbency almost instantly. Vinegar also helps reduce static and keeps colors vibrant.
It’s safe for most fabrics and washing machines. I avoid using it on delicate silks. This method works best with regular maintenance washes. Once vinegar works its magic, salt quietly steps in.
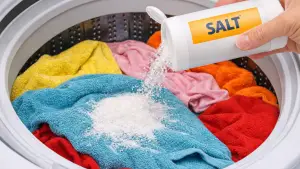
Salt
Salt softens clothes by helping stabilize fabric fibers during washing. I add a quarter cup of salt directly into the wash drum.
It works especially well for stiff new clothes and rough cotton blends. Salt also helps lock in color while improving softness. It’s gentle and leaves no scent behind. This method is best used occasionally, not every wash. Clothes feel smoother without being slippery. It’s simple and effective. After salt, borax naturally earns its place.
Borax
Borax softens laundry by breaking down mineral deposits from hard water. I add half a cup of borax to the wash cycle. Clothes rinse cleaner and feel more flexible afterward. It’s especially helpful for towels white bedding or simply removing stains.
Borax boosts detergent power without adding residue. Fabrics feel refreshed instead of stiff. I use it once or twice a month. It’s powerful but controlled. Next up is an unexpected pantry hero.
Glycerin
Glycerin helps soften clothes by retaining moisture within fabric fibers. I mix one tablespoon with warm water and add it to the rinse cycle. Clothes come out supple and smooth. This works especially well for knitwear and delicate fabrics.
Glycerin doesn’t leave a greasy feel when properly diluted. It’s a gentle alternative for sensitive skin. Fabrics stay flexible even after air drying. This method feels luxurious but simple. Epsom salt follows naturally.
Epsom Salt
Epsom salt softens clothes by relaxing fabric fibers during the wash. I dissolve half a cup in warm water before adding it. Clothes feel less stiff and more breathable afterward.
It works well with cotton and linens. There’s no scent left behind, just softness. This method is gentle and easy. I use it when fabrics feel heavy or rough. It pairs well with essential oils. Soap nuts are the next natural step.
Soap Nuts
Soap nuts naturally clean and soften clothes using plant-based saponin. I place a few nuts in a cloth bag and toss them into the washer. My clothes come out soft without residue. They’re perfect for sensitive skin and baby clothes.
Soap nuts don’t overpower fabrics with scent. They work best in warm or hot water. This method feels clean and traditional. It’s eco-friendly and effective. A final simple rinse brings it all together.
Soap Nuts can be purchased on Amazon.com
DIY Water-Only Rinse Cycle
Sometimes softness comes from less, not more. Running an extra rinse cycle with plain water removes leftover detergent residue. Clothes feel lighter and more flexible afterward.
This is especially helpful when switching detergents . No added products are needed at all. Fabrics regain their natural texture. Towels absorb better and clothes breathe easier. It’s free and foolproof. This method works best monthly. Once you try it, you’ll rethink fabric softener entirely.
Conclusion
Switching to these fabric softener alternatives completely changed the way my laundry feels, smells, and even wears over time. What surprised me most is how much softer clothes become when you stop coating them with heavy chemicals and instead let the fibers breathe.
These alternatives don’t just soften—they help remove buildup, reduce static, and keep fabrics in better shape wash after wash. Whether you prefer something natural like vinegar or wool dryer balls, or a simple pantry item like baking soda or salt, there’s an option that fits every lifestyle.
Mixing and matching these methods lets you customize softness without spending more money. Over time, clothes stay fluffier, towels absorb better, and colors look fresher. Your washing machine also benefits from less residue and clogging. Once you find what works best for your laundry routine, store-bought fabric softener becomes unnecessary.
Softer clothes really can come from simpler, smarter choices.
You May Also Like:
30 Bizarre Milk of Magnesia Cleaning Hacks That Actually Work