")
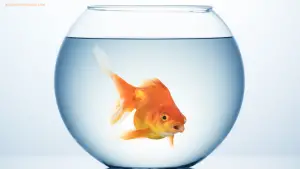
Let me tell you a little story first — because my first pet fish experience was… tragic in the most innocent way possible. I thought owning a fish would be the easiest pet decision of my life.
No walks. No fur. No vet bills. Just vibes and bubbles, right? Wrong. I bought the fish, filled the tank with water, dropped in some colorful rocks, and proudly placed it on the counter like a tiny underwater art piece.
What I did not buy? Knowledge. I had no clue how to clean the tank, what products were safe, or how often it even needed cleaning.
I wiped the glass with a random cloth once, added tap water like I was refilling a cup, and wondered why my fish looked stressed like it had bills and a mortgage.
The tank smelled weird, the water turned cloudy, and I learned the hard way that “fish tank aesthetic” and “fish tank care” are two very different things.
That little experience taught me one thing fast: cleaning a fish aquarium isn’t just about looks — it’s about survival, safety, and water health.
And that’s exactly what this guide is about — how to clean your fish aquarium (aka fish tank) properly, safely, and realistically — without harming your fish, stressing them out, or turning your home into a water disaster zone.
Why Cleaning Your Fish Aquarium Matters
Your aquarium is a closed ecosystem. That means everything inside it — waste, food, bacteria, algae, and toxins — stays inside unless you remove it.
Fish produce waste constantly, leftover food sinks to the bottom, algae grows on glass and decorations, and harmful chemicals like ammonia and nitrites slowly build up in the water.
When a tank isn’t cleaned properly, the water becomes toxic even if it looks clear. This leads to stressed fish, disease, cloudy water, bad odors, algae overload, and shortened fish lifespan.
Cleaning your fish tank isn’t cosmetic — it’s life support. A clean aquarium means healthier fish, better oxygen levels, stable water chemistry, and a tank that doesn’t smell like regret.
What You Should Clean Your Fish Tank With (Safe Supplies Only)
Never use household cleaners in a fish aquarium. No bleach. No glass cleaner. No disinfectant sprays. No soap. No scented wipes. These products leave residue that is deadly to fish.
Safe aquarium cleaning supplies include:
- Aquarium sponge or algae scraper
- Clean microfiber cloth (tank-only use)
- Gravel vacuum or siphon
- Bucket (never used for chemicals)
- Dechlorinated water
- Water conditioner
- Aquarium-safe cleaning brush
If it’s not labeled aquarium-safe — it doesn’t belong in your tank.
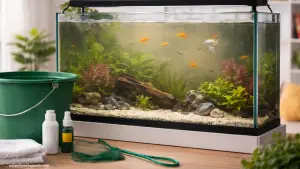
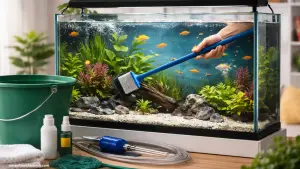
How to Clean a Fish Tank Without Removing the Fish
This is the safest and most common method for routine cleaning. Most cleanings should be done with fish inside the aquarium.
Start by unplugging all electrical equipment like filters and heaters. Use an algae scraper or aquarium sponge to gently clean the inside glass. Don’t scrub aggressively — you’re removing buildup, not sanding a wall.
Then use a gravel vacuum to siphon debris from the bottom of the tank. This removes fish waste, old food, and toxins trapped in the substrate. Only remove 20–30% of the water — never all of it. Replace the removed water with dechlorinated, temperature-matched water.
Finally, clean the filter media using tank water (not tap water) to preserve beneficial bacteria. Plug everything back in and let the system rebalance.
This method keeps fish calm, protects beneficial bacteria, and maintains stable water chemistry.
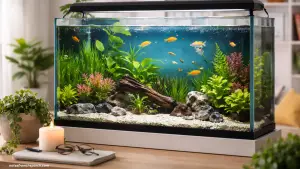
How to Clean Aquarium Decorations and Gravel
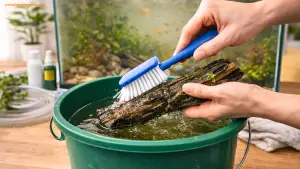
Decorations and gravel collect waste and algae fast. During partial water changes, remove decorations one at a time and gently scrub them in old tank water using a soft brush. Never use soap or chemicals.
For gravel, use the siphon to lift debris without removing all the substrate.
This keeps beneficial bacteria intact while removing toxins. Deep cleaning everything at once can crash your tank’s ecosystem — slow and steady always wins.
How to Clean a Fish Tank With Fish Removal
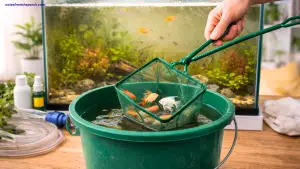
Sometimes fish removal is necessary — but it should be rare.
You may need to remove fish if:
- The tank is severely contaminated
- There’s a disease outbreak
- There’s toxic buildup
- The tank has not been cleaned for months
To do this safely, place fish in a clean container filled with tank water (not tap water). Keep them warm and aerated. Drain the tank completely.
Clean glass, gravel, and decorations with hot water only. Do not use chemicals. Rinse thoroughly. Refill with treated water, condition it properly, stabilize temperature, and reintroduce fish slowly.
This is a reset method — not routine maintenance.
How Often Should You Clean Your Aquarium?
Routine cleaning:
- Glass wipe-down: weekly
- Gravel siphon: weekly or bi-weekly
- Partial water change: every 1–2 weeks
- Filter cleaning: monthly
Deep cleaning:
- Only when necessary
- Never all at once
- Never remove all beneficial bacteria
Signs Your Fish Tank Needs Cleaning
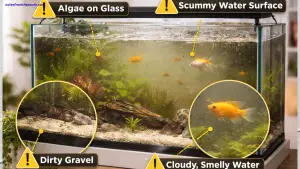
- Cloudy water
- Bad odor
- Green algae buildup
- Fish gasping at surface
- Slimy tank walls
- Dirty gravel
- Uneaten food buildup
If you see these signs, your aquarium is overdue.
When to Call for Help
You should seek professional aquarium help if:
- Fish are dying rapidly
- Water tests show toxic ammonia levels
- Disease spreads quickly
- The tank ecosystem collapses
- You can’t stabilize water chemistry
- The filter system fails
Local aquarium stores, aquatic vets, and professional tank maintenance services can diagnose problems fast and prevent total loss.
Final Thoughts: Clean Tank = Healthy Fish
Cleaning a fish aquarium isn’t about making it look pretty — it’s about creating a stable, healthy environment where fish can actually live well. A clean fish tank means less disease, less stress, better oxygen, better water chemistry, and longer fish life.
When you understand why the tank needs cleaning, what to clean it with, and how to clean it safely, fish care becomes simple instead of stressful.
Whether you’re doing gentle in-tank maintenance or a full deep clean, the goal is always the same: protect the fish first, protect the ecosystem second, and clean the tank third. Because a healthy aquarium isn’t just clear water — it’s balanced water, safe water, and stable water.
And trust me — your fish absolutely feel the difference.


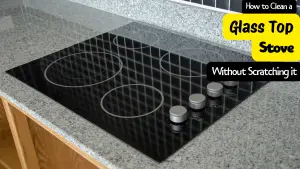 I have always used electric stoves with grates and burners but, I recently moved into my new home that have a glass top stove. This made me wondered, how on earth do I clean a glass top stove without scratching it. However, I figured it out so, if you are in the same situation here is how to clean it.


")

 My Little Kitchen Discovery